Note: this module is best completed on a computer or in the web browser version of Edmodo not the iPad app.
Module Aim
Staff understand how to set up and organise groups and small groups within Edmodo.
For a teacher, organization based on classes, subjects or periods is key! Groups make it easy for the teacher to distribute notes, assignments and quizzes, and provide a way for students to communicate and collaborate. You can make a separate Group for each class or period. There is no limit to the number of Groups you can create, and there is no limit for the number of Groups a student can join.
Step 1 – Create a Group
Create a Group by following the steps below:
- Select the “Plus” icon
 next to “Groups” on the left side panel of your Edmodo Homepage.
 - Select “Create.“
- Enter a Group name, select the correct grade or range of grades, subject area and subject in the pop-up box that appears in Step 1.
- Click “Create” to move on to Step 2.
- Enter your “Expected Group Size” and a description of your group. There is no limit to how many group members can join, expected Group Size just lets you track how close to having all your members join you are. This can be changed at any time.
- Click “Finish” to create the group and go to the Group page.
- Locate the 6-digit Group code on the Post Stream as well as the left side panel. Please give this code to your students, they will need it to join your Group. The Group code automatically lock after 14 days or if the teacher locks the Group before that time. If a locked code is used, a request to join will be sent to the teacher for their approval.
Note: Editing your group moderation settings can be done once the group has been created. Also note, using unique Group names is helpful when you want to archive a Group from one year and create a new Group the next year, for example: Period 1 2013 and Period 1 2014. You cannot have two Groups named Period 1, even if one of them is archived.
If you’re finding it difficult to follow the instructions above, watch the following video:
Step 2 – Create a Small Group
To get started using Small Groups, follow the steps below:
- Select the desired Group on the left panel of your Edmodo Homepage.
- Select the “Plus” icon
 in the “Small Groups” section on the left side panel.
 - Click “New Small Group.”
- Enter a small Group name, and click “Create”.
Once you’ve created a Small Group, it is time for you to add students to the Small Group.
Note: At this time, the gradebook is only organized by the main Groups and any grade given to students in Small Groups will appear in the main Group gradebook. Teachers get creative with Small Groups, just think about all the possibilities!

Step 3 – Change Your Group Description and Settings
Having full control of your class has never been easier! As the owner of the Group, you have the ability to set certain restrictions for the Group as well as specific Group members. Even if you turn your head for a minute, you will still be able to focus on classroom management.
Group Description
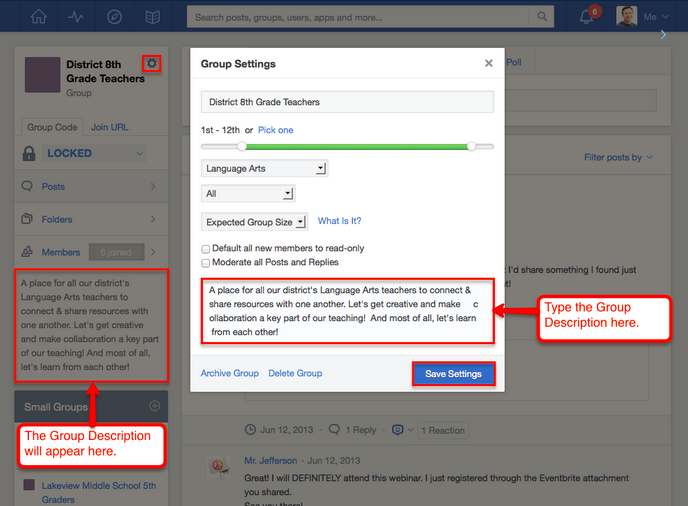
You can create a Group Description for a group that you own to provide information about the group to the group members. The Group Description will appear in the left panel of the group’s home page, right below the group name. You can enter the group description when creating a group, but if you want to add a group description or edit it later, simply follow these steps:
- Click on a Group in the Groups list on the left panel (if your group does not appear here, please click on “Show All”).
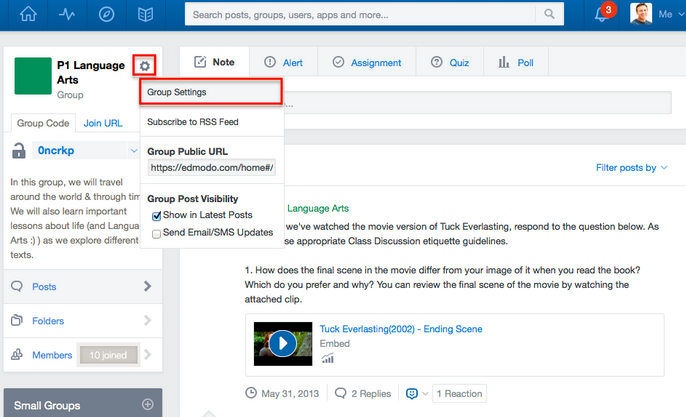
- Click on the “Group Settings” icon
 to the right of the group name.
 - Click “Group Settings.”
- Type your Group Description in to the text-box at the bottom of the Group Settings window.
- Click “Save Settings.”
Note: There is a 260 character maximum.
If you need to change aspects of your Group you can do so through Group settings. You can rename your Group, change the grade level of your Group, change the subject area of your Group, and change the Expected Group Size. You can default all new members to read-only status, moderate all posts and replies, archive and delete your Group and change your Group description all from the Group Moderation Settings area.
Group Settings
To access your Group settings, follow the directions below.
- Select the Group from the left side panel.
- Select the “Group Settings” icon
 to the right of the Group name and click “Group Settings.“
 - Change your Group name, grade level, subject area, subject, or Expected Group Size and click “Save Settings” to save the changes.
- When you create a group, you can set your “Expected Group Size”, although, there is no limit for the number of members that can join the group. After selecting an “Expected Group Size”, a progress bar appears on your member tab, showing how many members have joined. Once the expected size has been reached, the progress bar will be fully green.
- You can also Archive or Delete groups from this “Group Settings’ page.
Note: You can also set your Group level notifications if you want to receive notifications from some, but not all of your groups.
You can also change your group moderation settings if you want to: set members to read-only, moderate all posts and replies, archive and delete groups.
Step 3 – Manage Members in Your Group
You can manage your Group members by following the steps below.
- Click on the Group on the left panel of your Edmodo Homepage.
- Select the “Members” tab from the left side panel.
On the Members page you can:
- Set Group member status, view what notifications your students have signed up for, download and print member Account information and parent codes, change student passwords, see student usernames, and remove members from your Group.
Click “More” to the right of the Group member name to take the following actions:
- Remove that member from the Group by selecting the “Remove from Group” button.
- Change the member’s password by selecting “Change Password.”
- Retrieve the parent code for that member by selecting “Parent code.”
- Put that member in read-only mode by selecting it from the access drop-down menu.
- Change a student’s school if their school is different than your own.
Note: You can search for members in your Group by using the search field in the upper right corner of the Manage Members page. Removing a member from one of your Groups does not delete that member’s Account, it just removes them from your Group.

Demonstrate Competency
To demonstrate competency staff submit two screen shots to the Edmodo iPad PD Group under Module 2.2: 1) a screenshot of a group they have created in Edmodo with the Group Settings window open, and 2) a screenshot of the members section of their group with members inside (if teachers do not have students in their group yet, that is OK so long as they know where they can edit the settings for group members).